I’ve wanted to cosplay for many, many years. Before this year, however, I never had the courage. I always assumed that I would take up too much space, that people would look at me too much. As I’ve gotten older, I’ve realized that taking up space is not actually a bad thing. If people judge me adversely for cosplaying, that’s their problem, not mine. With this in mind, I recently created my first costume! One of the absolutely hardest parts for me was starting. With many projects, it can seem incredibly daunting at first. Luckily, we have many resources here to help with that. Regina made an absolutely wonderful list of costuming books. Though it’s labeled as being for Halloween, many of the titles work year-round! If even a book is overwhelming, keep reading for my list of how to get started.
1) Pick a character or concept you love and want to bring to life.

This is perhaps simultaneously the most fun and the most stressful part of cosplaying. There are essentially endless options of who to cosplay. I would recommend picking someone or something that you have had a special connection to for an extended period of time. When my friend and I first decided to get into cosplay, she decided to start with the choir garb from Bloodborne. At that point, she was very into that particular video game and that set looks remarkably cool. We quickly discovered, however, that once the passion for Bloodborne wore away with time, so did the desire to cosplay. That’s when we changed gears to focus on making a space wizard of our own design. Because the cosmos have been a special interest of hers for years, it was much easier to stay enthused about the project even during the grueling parts. Essentially, make sure you pick a topic or character that you can stay excited about for a long period of time, because the project is going to take longer than you expect.
2) Figure out what your rendition will look like.
It may seem odd to have this as its own separate step. Isn’t that the same thing as picking an outfit? I discovered that the two, while related, are actually quite different. It is, of course, technically possible to make just about anything, even if it seems like it defies the laws of physics. Clever contraptions, devious devices, and insane illusions all make it possible to achieve looks that seem like they come right out of a comic book. But frankly, not all of us have the time, money, or resources to accomplish these feats. If you do have the ability to make something completely accurate, that’s awesome! You can go ahead and move on to step 3. If for any reason, your source material seems a little out of reach, consider adapting it to fit you. Ask yourself, “What is essential to this character’s design? What needs to stay the same?” Let’s say, for instance, you discovered that the library recently added 7 volumes of “Kirby Manga Mania” to the collection. Reading these delightful books has reminded you of how much you love the little guy, so you decide you want to make a Kirby cosplay! You can, of course, craft an absolutely gigantic paper mache globe that you precariously perch inside. No one can argue that that would be awesome. But maybe you don’t actually want to be inside a giant snow globe with limited visibility all day. In that case, what elements of Kirby’s design can you keep? His iconic pink color has to stay, of course, as do his red shoes. His eyes are pretty distinct, but honestly, I think his overall shape is less important. Maybe you wear glasses that mimic his eye shape, a pink puffy dress, and red pumps. Or perhaps you cut out felt eyes and sew them onto a beanie, wear a bright pink suit, and red Converse. Add the right accessories to either outfit, and you’re good to go! Though some may disagree, I say that this absolutely still counts as a valid and wonderful cosplay. An outfit inspired by a character can be just as fun as a completely 100% accurate cosplay. This step can also be as simple as deciding that though the character is wearing three different layers of scarves, you think only one is necessary to get the vibe across. Save yourself some time and money and don’t do as many layers. One of my favorite quotes applies. “Don’t let the perfect be the enemy of the good.”

3) Break the outfit down into individual parts.
Once you’ve picked your character and figured out what your particular take is going to be, now it’s time to actually start working on logistics. Most outfits are going to have many, MANY different parts. Even if the character is only wearing a very simple t-shirt dress, you still have to figure out the hair, makeup, and shoes, for instance. Looking at the whole of a character can be overwhelming. That’s why I recommend creating manageable chunks and working on those one at a time. Not only does this lessen overwhelm, but it has the added benefit that if you get annoyed with one part, you don’t have to stop cosplaying as a whole. Instead, you can just put that particular section down and pick up another until you feel ready to try again.
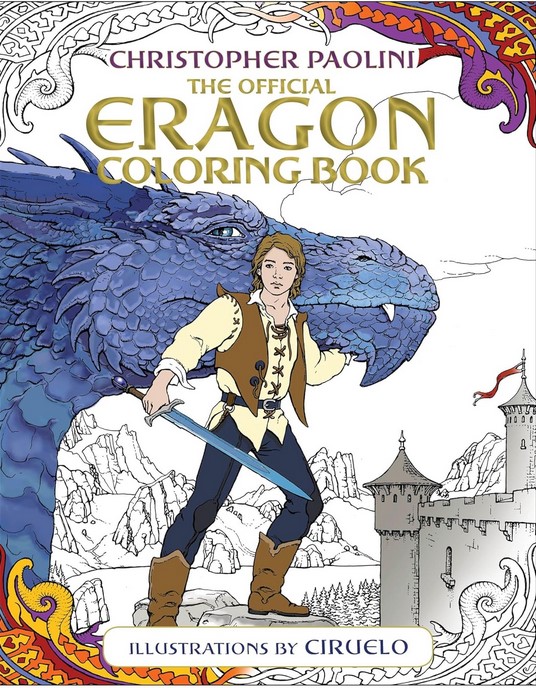
 Maybe you recently read “Murtagh” by Christopher Paolini and it reignited your love for “The Inheritance Cycle.” You decide that you want to cosplay as Eragon, using this official art as inspiration. His outfit can be broken down into
- A cream-colored medieval shirt
- A brown vest
- Dark blue pants
- Brown boots
- Accessories (belt, sword, etc.)
Personally, I find a list like that helps to focus my mind. As Confucius once said, “The man who moves a mountain begins by carrying away small stones.”
4) Make a list of all the materials you’ll need for each part.
Now that you’ve got it generally broken down, it’s time to make the chunks even smaller! From this point, take the list you already made and write down everything you think you may need to create that distinct piece. I would recommend doing this for all the parts at once. I discovered the hard way that if you wait to gather the materials for one part until you’re totally done with another, you will end up making an absolutely ridiculous number of trips to the store. Save yourself the time and go ahead and do all the thinking at once.
You may feel like you’ve already broken the costume down as far as you can go. In a lot of cases, it depends on how much you plan to make yourself. If you want to fully customize everything, your list will be much longer. Continuing with the previous example, if you happen to find a shirt that perfectly matches what you want, awesome! You’ve got that part covered. If, however, you decide you want to try your hand at making a shirt yourself, you’re going to need a lot more. At minimum, Eragon’s simple medieval-style shirt can be broken down into
- Fabric
- Matching thread
- Brown yarn for details
- A pattern (or a book like this to help you make your own)
Narrowing down as much as you possibly can and planning ahead is going to make your life so much easier when it comes time to put everything together, I promise you.
With that and a trip to the store, you’re ready to begin working on your costume. Hopefully, your proper planning will make your cosplay experience much easier than mine. You should be able to jump right in. If you’re like me, however, even with preparation, some things may still not go as desired. Instead of getting frustrated, consider treating the roadblock as an opportunity to learn. I learned a lot of life lessons from costuming for the first time. Check back in later for even more lessons learned. Until then, happy crafting (and don’t forget to check out Hoopla and Libby for audiobooks to put on while you work!)

